A plain piece of paper seems boring or intimidating at first glance, but if you invest a little bit of creativity and patience you might create something really beautiful out of it. You can not only draw or paint on it but also use the paper to fold figures, thus multidimensional things!
First of a short overview of the history of origami:
Origami is the art of folding paper. This word has is roots in Japan since “Oru” in Japanese means ‘to fold’ and “Kami” means ‘Paper’. Thus, it can be translated as ‘to fold paper’. If origami was originally invented in Japan, however, is not sure. About a thousand years ago,it might as well originate from China. Paper is a material that degrades very quickly and therefor it is hard to trace back the origin of origami. Nevertheless, we know that origami was very prominent beginning in the 1490s. There was even a poem written about butterfly origami in 1680 by Ihara Saikaku. This also revealed that paper folding was quite at an advanced level to that time in Japan and a big part of the culture there. From then on, origami slowly spread to the rest of the world, including Europe. The educational benefits of origami were discovered and it therefor had a part in the daily school life as well. But not only the very accurate folded paper figures you might have in mind now. There were many different styles to it. Also including very loosely folded origami. Everything was up to the personal taste of the creator.
Of course, the outcome of your origami is also up to you and you can change it like you want it to but the most prominent form of origami today is the crisp and precise folded papers that look exactly like it was intended to look from the beginning. Here is a step by step instruction for a paper box for you to try this kind of origami. This is also great to use as a packaging for a gift or as storage. You can make it in any size. If you follow the instruction carefully, it should be rather easy, but make sure to be exact with the folds, so that the lid fits on it like you want it to.
Materials:
You will need a square paper,
and eventually some markers to color the box when you are finished. But this is optional!
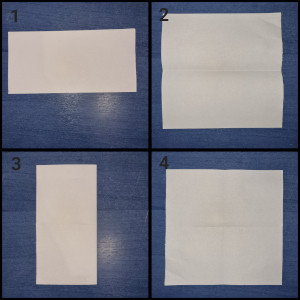
1- Fold the paper in half
2- Unfold it again
3- Fold the right edge over to the left edge
4- Unfold it again, you should see a cross on your paper now
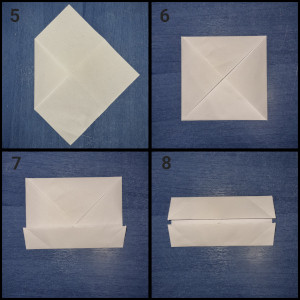
5- Rotate the paper and fold one corner up so that it meets the center of the cross
6- Repeat that on all the corners
7- Fold the bottom edge up to the middle
8- Fold the top edge down too so that the edges meet in the middle
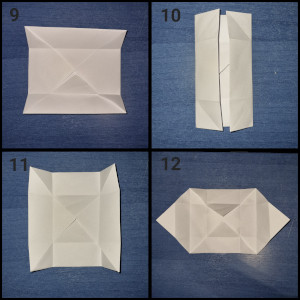
9- Unfold step 7 and 8 again
10- Fold the left and the right edges in the middle
11- Unfold it again
12- Unfold the left and the right section completely
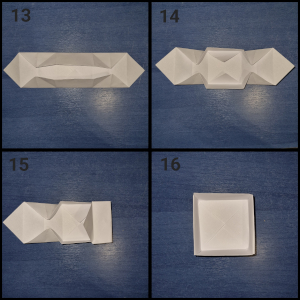
13- Fold the top and the bottom edges to the middle along the creases that are already existing
14- Open up the middle part and fold the left and right section upwards
15- Bring the left and the right section over to the middle
16- Now you should have your own folded origami box in front of you
To make the lid use a paper square about 5 mm bigger on each side than the paper you used for the box.
sources:
https://origami.guide/history-of-origami/ (origami guide editors, 9.11.2022)
https://www.britannica.com/art/origami/History-of-origami (Nick Robinson, 9.11.2022)

