Do you enjoy going camping? Or sailing? Have you ever built something on your own? In this case, you should know that knots are essential to actually implement our ideas, since they are the basis of every construction.
Let’s have a look at a few knots that could be really useful in the realization of your ideas and camping designs!
REEF (or Square) KNOT:
If you are a scout, you know that this kind of knot can be considered as the father of all the knots. If you don’t know what to do, the reef knot is always the ace up the sleeve, ready to come to the rescue.
It is used to join two ropes together or, even better, to secure a piece of rope around an object.
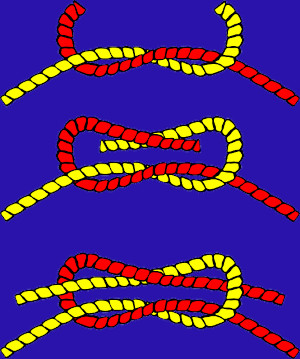
So, you have to take two pieces of rope and hold one in each hand. For the beginners, it would be ideal to practice with differently coloured ropes. Therefore, let’s say that in the right hand you will hold a red rope and in the left hand a blue one. Cross over the blue piece on the right piece. Then, twist the blue piece underneath the red one and finally twist it over again. So, at the end of this stage, you will have a twisted pattern where the blue piece of the rope would cross the red piece over, under and over again. Now, circle around the two ends and cross over the blue end on the red end. Twist the blue end underneath the red end and then twist it over again (you have recreated the same twisted pattern, but this time from the right to the left). It’s time to pull tight and…your reef knot is completed!
HITCHING KNOTS: These knots are used to fasten ropes to posts.
CLOVE HITCH: First you have to wrap the rope all over the post. Then, you wrap the rope over itself, as if to create the figure of an X, and next you wrap it again underneath the post. The last step consists in threading the rope in between the two loops (which you created by wrapping the rope two times around the post), or rather, the legs of the X. And now it is time to pull tight!
COW HITCH: This is another winding knot. It is very simple to tie and very popular. It takes its name from its main use in the past, or rather, cattle tying. I bet that you have already tied this type of knot without knowing its name. Actually, if you have two working ends of the rope, to have a cow hitch you just have to fold over one end of the rope to make a double line: then you wrap the loop around the pole and you thread the double line into it. However, if one end of the rope is already tied, you have to change your plan. First, wrap the rope all over the post. Then, cross the working end under the standing end and wrap it again all over the post, but threading it inside the loop that has been created. Have you nailed it?
STOPPER KNOTS: These category includes all the knots that prevent the rope from slipping through narrow holes.
OVERHAND KNOT: I bet that this is the first knot that you have ever learned, even without been taught. It is the basic stopper knot, but it comes up with a flaw: it can be very difficult to untie. However, here how it is tied. First, make a loop crossing the standing end of the rope on the working end. Then take the working end and thread it inside the loop. Time to pull…not too tight, though!
TRIPLE OVERHAND: it is a simple and nice knot, very thick and thus very effective. As suggested by its name, it is like a overhand, but triple! So, first of all, make a loop crossing the standing end of the rope on the working end. Then take the working end and thread it inside the loop three times. And now it’s time to pull tight. Easy as a pie!
FIGURE EIGHT: another popular stopper is the “figure eight”. To tie this knot you just have to make a loop by crossing the working end under the standing end and then twist it all around the standing end. Last but not least step, thread the working end inside the loop and…pull tight!
DOUBLE SURGEON’S LOOP:
This knot is very easy to make and useful to create loops at the end of the ropes. The first step is to fold over the end of the rope to make a double line. Next, use the double line to tie a overhand knot. As you will notice, the working end is a loop. Pass the working-end/loop through the hole of the overhand knot one more time. And now it’s time to pull tight!

SOURCES: https://www.maritimemuseum.co.nz/collections/10-essential-knots-every-sailor-should-know
https://fishing.scoutlife.org/8-fishing-knots-to-know/
https://www.nauticando.net/lezioni-di-nautica/nodi-marinari/bocca-di-lupo/
https://www.hinelson.com/blog/nodo-scorsoio-cappio-come-fare/
