https://cdn.pixabay.com/photo/2015/05/21/13/45/radio-777219_960_720.jpg
Building a Radio is easier than you might think. And you probably have most of the things you need at home.
What you need:
• 20m of a wire with plastic insulation
• 9m enamelled copper wire
• 1 Germanium Diode
• Adhesive tape
• Nail-file/sandpaper
• Rubber band with a diameter of 2-3cm
• Headphone with at least 16Ohm
• An empty toilet-paper roll
Before we start I must also say that your parents should be near to you in order to help you. And secondly your workspace should be near to a water tap or a heater as we need to earth a piece of the wire. And a water tap or a heater is the easiest way to make sure that the wire is neutral.
Now lets start.
1. For the first step you need the toilet paper roll and the enamelled copper wire. Using the wire you poke a hole, about 1cm from the left edge, into the toilet paper roll. Them you attach the end of the copper wire to the toilet paper roll through the hole. After you did that you have to wrap the copper wire around the toilet paper roll in order to make a perfect coil.
2. If you now have either 10cm of wire or 1cm of toilet paper left you poke a hole again with the wire right next to end of the last turn and one hole a few mm away. Then you stick the wire to the hole next to the last turn and back up through the one a few mm away. If your wire is now longer that 10cm you can cut it to about 10cm.
3. For this step you will need the adhesive tape and your self made coil. You now have to fixate the coil winds with three stripes of tape.
4. Now you need your coil and the nail-file. Take the nail-file and grind away the layer of paint on the last centimeter of the 10cm wire that you have sticking out of the toilet paper roll.
5. Now you need to work very carefully. Using the nail file you file away a the layer of paint on one side of the coil in a fine line. Be care full that it is just on the top as the winds should not have a electrical contact.
6. For this step you need wire cutters and your plastic insulated wire. With the wire cutters cut of 15cm of the wire. Also carefully using the wire cutters take off the insulation on both ends of your piece of wire, around 2cm on each side.
7. Now we get to the construction. We now need a piece of grounded metal (the unpainted part of the heating tube or the water tap). Now cut of a piece of the plastic insulated wire that goes from your grounded piece of metal to your coil. Again take of the insulation on both ends of the wire. One end you wrap around your grounded piece of metal so it has good contact. The other end we will need later on.
8. Now 10 to 15 meters of your plastic insulated wire should be left. These will be your Antenna. Span them in long straight pieces around your home. Be careful that your antenna has no contact to the grounding.
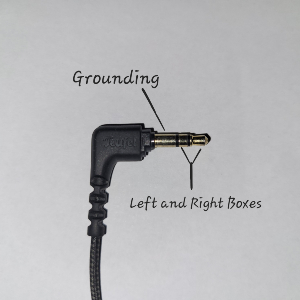
9. Now look at your stereo jack it should have three contacts.
The front two are for the boxes and the rear one is the grounding.

10. Now you can start the assembly. The end of the copper wire (the one where you grindet the paint off) you connect with the grounding cable ( the one connected to the grounded metal (water tap or heating tube)) and then you connect them both to the grounding part of your headphones audio jack.
11. Now you need your diode one end you connect to the front part of your audio jack. The other end you connect with one end of your antenna and the the one end of the 15cm wire piece. The other end of the 15cm wire piece you bend so it has a U-shape.
12. With the use of the rubber band you connect the U-shaped end with the part of your coil where you took of the paint.
13. If you now put the headphones in your ears you should hear a high pitched noise.
14. If you hear the high pitched noise you can start searching for a radio channel. For that you move the u shaped part of your wire around the part of the coil where you took of the paint until you hear music or voices. As soon as you hear them you found the frequency of a radio channel.
And that it is in 14. easy steps you did now build your own radio. Congratulations!!!
Sources:
https://www.google.com/url?sa=t&rct=j&q=&esrc=s&source=web&cd=&cad=rja&uact=8&ved=2ahUKEwix5-CO6dP7AhXuhv0HHW-jDWEQFnoECA4QAQ&url=https%3A%2F%2Fscoutlife.org%2Fhobbies-projects%2Fprojects%2F40%2Fcatch-some-radio-waves%2F&usg=AOvVaw1ZQqyH7-Dr-vNJn1hnISVP (29/11/22)
https://www.wikihow.com/Create-a-Simple-AM-Radio (29/11/22)
https://electronics.howstuffworks.com/how-to-build-a-radio.htm (29/11/22)

